A PDF of the Arcpad 10 manual (750 pages) is available online here
Make sure Bluetooth and Wi-fi are turned off if not in use for maximum battery life.
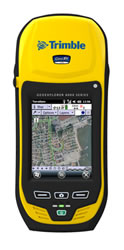
The ARF owns several GeoXH 6000 GPS units as well as older GeoXH units (listed separately). We began trading in our older units in 2011 for the 6000 series units because they offer some advantages for archaeological fieldwork. In addition to the ruggedized case of the older Geo series the 6000 includes better positioning (Spotlight), changable (hot-swappable) batteries, no cradle, and a built in camera for photo documenting features.
One Tornado antenna is available for use with the GeoXH 6000 GPS, and the Zephyr works as well though Tornado is more appropriate for the 6000.
View a list of international GPS Reference stations for differential correction post-processing.
The actual software installers are available online for Trimble software including desktop software: GPS Pathfinder Office and GPS Analyst for ArcGIS as well as mobile software Terrasync and GPSCorrect for Arcpad. Installers can be found by product by going to Technical support > Downloads. An Authorization code is needed.
System Summary (from Trimble Specs page)
- Dual-frequency GNSS receiver and antenna with Everest™ multipath rejection technology and Floodlight technology
- Sunlight readable 4.2" polarized screen
- Optional integrated 3.5G cellular modem
- Integrated Wi-Fi and Bluetooth wireless technology
- 5 megapixel autofocus camera
- Windows Mobile® 6.5 (Professional edition)
- Rugged and water-resistant design
GPS Software available on GeoXH 6000 units
Computer software available for analysis of field data (windows)
- GPS Analyst for ESRI ArcGIS (not compatible with ArcGIS 10.1)
- Trimble Pathfinder Office
One set of the following equipment was purchased with these GPS units
- Tornado antenna
- Protective Trimble hard case
- DC adapter (cigarette lighter adapter) charge cable
Notes for GeoXH 6000 GPS units
Battery swap and shut down procedures
Batteries are hot-swappable. To swap your battery finish mapping a feature (the unit will be put to sleep) hold down the power button until a control screen comes up with Swap Battery as one of the options. You have 30 seconds to squeeze the end of the battery to eject it and insert a fresh battery.
To shut down for long term storage hold down the Power button and choose Shut Down from the control screen.
Software configuration
For best performance major updates to the software should include a factory reset to the default software configuration and reinstallation of the added software.
The following configuration is used during reinstallation.
- Fill in Owner Information on front screen including institute name and phone and email.
- Install Trimble Terrasync from Windows using our activation code. Use the Trimble Installer because the Trimble software activation follows the actual WinMobile install step.
- Configure Terrasync (5.30): Launch. Choose Setup > Logging Settings: Antenna Height = 1m (handheld). Point/vertex Pause: 1sec (averages 2 positions per point). Real-Time Settings: Choice 1 = Integrated SBAS, Choice 2 = Uncorrected GNSS (enables WAAS support in North America).
- Arcpad. Using the ESRI Arcpad Deployment application (if it's the first time on the PC or just check boxes in Add/Remove Programs if it's not) install ESRI Arcpad as well as Streetmap, Sample World Data, Arcpad Today Screen, NADCON and HARN tables (for North American users), as well as Spanish Language Pack. Also install VBScript and and SQL Server 2005 software (these will require a restart of the GPS).
- Install Trimble GPSCorrect for Arcpad using the Trimble installer so that the Activation code can be entered and the activation file installed. Do not load any LANGUAGE DLL files or your GPSCorrect will be entirely in that language with no option to switch (this will require a reinstall to remove!).
- Launch ESRI Arcpad, enter our serial number on first screen so it's not in Demo mode. Open GPS Preferences and confirm that Trimble GPSCorrect is the protocol. Choose the Capture tab to Enable Averaging, Points: 50, Vertices: 5, Postion: 2, Distance Interval: 3m. Choose Quality tab and enter Non-Compulsory Warnings and check Maximum PDOP of 6. GPS Height tab, Antenna height= 1m (handheld mode).
- Configure Trimble GPSCorrect inside Arcpad: Click GPSCorrect icon, choose Setup menu, Logging Settings: GNSS to SSF = On, Real-Time Settings: Choice 1 = Integrated SBAS, Choice 2 = Uncorrected GNSS.
- Configure the Windows Mobile 6.5 Today screen. Choose Settings > Home, choose Items and uncheck Calendar and check Device Lock. The checked items should be Date, Wireless, Arcpad Today, and Device Lock.
Notes on Trimble Terrasync (v5) GPS software on Windows Mobile 6.5 device
When first installed on an ARF Trimble GPS Terrasync is configured as indicated above.
Typical Use:
- Start GPS unit using green button at base. Note the battery level (top of screen) and make sure it is adequately charged prior to fieldwork.
- Click the Start menu (lower left) and scroll down to Terrasync icon, tap to start
- When the software starts choose “Professional Edition”
- It will take 3-5 minutes in an open area away from trees and buildings to first acquire enough data for a GPS position. Go to Status in Terrasync and when PDOP is under 6 your position is reasonably well determined.
- To simply acquire the coordinates at your location in the current coordinate system you can view coordinates under Status.
- Saving data to a file. From the menu (top-left) choose Data and then Create File. The filename is typically formatted as follows :R “Rover” MonthDayHourA but it can be changed if necessary. For best results create no more than one or two files per day with multiple features within them. Start a new Rover file if you add or remove an external antenna or otherwise change the receiver settings. Close out the Rover file whenever you shut down the GPS or stop the Terrasync software.
- A box may appear asking for Antenna Height, Antenna Type. In most cases use Height: 1.0 m antenna (operating a waist height) and Type: Internal Geo 6000 for the GeoXH 6000 units. The internal antenna is located under the logo on the top portion of the Geo GPS.
- When a file is open you can create a Point, Line, or Area (Polygon). While the software is recording a point (note the counter at the top) you can add a brief title, note, or Site Number to the feature. A sequential ID number is visible next to the Note field and that number is persistent within the file so you may log that ID number in other notes or forms.
- If you are logging a Point the expectation is you will hold still at that point while it is being recorded. If you are logging a Line or Area you move the GPS along the perimeter of the feature while it’s recording.
- Higher accuracy points (e.g., a site datum location): Do not set the GPS on the ground or on a large rock when recording hundreds of positions into a single point. While the GPS will function on the ground you risk having multipath interference. It is best to use an external antenna on a stadia rod for higher accuracy points. If you’re using the internal antenna place the GPS on something like a backpack or another object to raise it slightly off the ground with the internal antenna (top portion of the GPS) centered over the point of interest).
- End of work: At the end of the work day close Terrasync (agree to close the file). If you will not be working again for several days consider saving power by shutting down the GPS completely: hold down the Green button for 5 seconds and choosing Shut Down.
-
Terrasync logs data in a proprietary format that is typically converted using Trimble Data Transfer Utility (free online, windows only), however you can export the coordinates from a Rover file to a Shapefile on the GPS unit and transfer it immediately using the SD-Card slot by highlighting the new file in the File Manager and choose Options > Copy to… Storage Card.
- Terrasync Coordinate Settings
Coordinate system can be set under Menu > Settings ... Coordinates
-
Latitude & Longitude
If you’d like coordinates in degrees of latitude and longitude select Latitude/Longitude from the list. Note that you cannot make areal measurements in lat/long because the units are not metric and are not projected. The advantage to latitude/longitude is that it works over the entire globe include polar regions and you do not have to be concerned about the Zone as you do with UTM.
- Universal Transverse Mercator
If you’d like UTM (metric) coordinates choose Setup from the top-left menu and select Coordinates. Under System choose UTM, under Zone select the appropriate zone for your region specifying the northern or southern hemisphere. A global UTM lookup webpage available at http://www.geoplaner.com/
A complete record of location using UTM coordinates will contain the UTM Zone, Northings (7 digits), and Eastings (6 digits). If your Eastings are over 6 digits or are negative you have likely set the GPS to the wrong UTM zone. On the same Setup>Coordinates page Terrasync can be set to show metric elevation as Mean Sea Level (MSL) or Height Above Ellipsoid (HAE). If you are near the coast and the GPS shows you are below sea level this is probably because the generalized ellipsoid model is inappropriate for that location, so consider switching to MSL. Read more about the differences between MSL and HAE online. More detailed overviews of the UTM system can be read online.
- Datum
North American Datum (NAD) 1983 and World Geodetic Datum (WGS) 1984 were very close when they were originally created but they are about 1m apart today. Thus, for many GPS based regional archaeology projects, the two are basically interchangeable. The difference between the older NAD 1927 datum and NAD1983, known as NAD Shift, is up to 100m away in the continental US (see reference map)
In Terrasync the Setup > Coordinates page lets you specify the Datum. Most work is in NAD1983 or WGS1984, satellite imagery and topographic data layers are generally in WGS1984 which is also the native Datum of the GPS system. If you are relocating older site locations you may wish to have your coordinates in NAD1927.
- Other terminology
You will increasingly see Global Positioning System (GPS) referred to as GNSS (Global Navigation Satellite System). This is because GPS is the US government NAVSTAR technology available to the public since the 1990s. GNSS is more generic and refers to GPS as well as the Russian GLONASS and the European Galileo satellite navigation constellations. More information about this and the future of these technologies (GNSS modernization), such as the improved L5 signal is online.
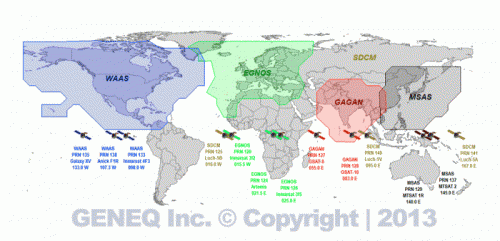
Correction signals. There are numerous satellite based correction signals available today developed primarily for aviation. These are referred to generally as Satellite Based Augmentation System (SBAS). The one available in North America is Wide Area Augmentation System (WAAS), while various systems have emerged for Eurasia (map). A good explanation of the system current in 2013 is available online here. A global SBAS correction system is anticipated in the future.


